Raspberry PI 2 temperature logging (using DS18B20 as temp sensor)
- Background
- Measurements
- The DS18B20 temperature sensor
- Raspberry pi based system (hardware)
- Raspberry pi based system (software)
- Source code:
Background
It’s been quite hotter in my appartment this year, and the previous year. Last year, I had forgotten to close one of the blinds when I went on vacation, and then I ended up having 32°C in the appartment when I got home. It took much more then a week to get the level down to something survivable, but I thought it could have been a one time all high.
This year, I made sure all blinds I own was closed before going away for two weeks, but the temperature was still 27.5°C when I got back, even though it was raining, and below 15°C outside.
This year, I thought I had a secret plan to combat the heat: A fan with a decent capacity of moving air around. The idea was to have it standing in the main entry door, having the kitchen window open, and let it blow air through the appartment. (The main door is on the shadow side of the building.)
Turned out, that even with that arrangement, it took over a week to get rid of the heat, even though we had a bunch of cloudy days, and I kept the fan going till late after midnight whenever I could (a bunch of days, the outside temperature was just 10 degrees, but that didn’t help much). Too much heat is stored in the concrete of the building.
Measurements
In the beginning, I had two identical thermometers, both giving indoor and outdoor values (although all four sensors are placed inside the appartment at different places). The only measurement data I get out of them is max and min temperatures, which I read once a day.
I looked around, and you can buy temperature loggers for consumers, to get more frequent readings logged automatically. But why buy an existing product, when you can get the same results with a little bit of development on your own.
The DS18B20 temperature sensor
The first part of the logging system is the temperature sensor. I choosed the DS18B20 sensor based on two criterias: Good enough accuracy as well as a quite decent resolution.
Raspberry pi based system (hardware)
Anyhow, since I didn’t own a revision 2 of raspberry pi, I thought that was a good excuse to go and by one. I also got a bunch of DS18B20 temperature sensors at the same time (had to visit 3 different stores of the same chain to get the number I wanted). The connection diagram looks like this:

I found the green raspberry pi figure at wikimedia, under a CC BY-SA 4.0 license. That means that that license taints my derived work, so anyone can reuse it under the conditions listed in CC BY-SA 4.0. My main addition to it is the circuit diagram part.
The breadboarded circuit looks like this:
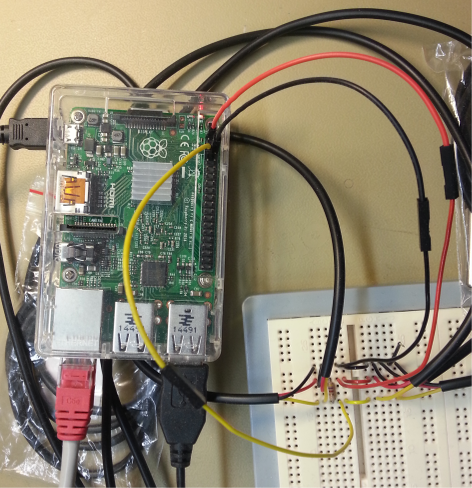
The breadboard build is spectacularly non-interresting. Just five temp sensors paralelled on the one wire bus, and a 4k7 pull up resistor on the data line connected to the 3.3V line. Note that my sensors just have three small wires coming out of them. The wires are actually so small that it was tricky to get a good connection on a breadboard, so I would recommend soldering them for most people.
Raspberry pi based system (software)
The setup of the Raspberry Pi 2 went really smooth. I used the Noobs Lite image from https://www.raspberrypi.org/downloads/, which is a small image (about 22MB) that you download to a memory card, which automates downloading the real OS, as well as part of the installation process for several different OS versions that can run on the Raspberry Pi.
I had read some information about using 1-wire thermometers with Raspberry Pi, so I made one slightly odd setting in the text based raspbian setup menu: Use device tree (it’s something arm specific), in case that was needed (although it might be the default option).
I added the lines he suggested to ‘/etc/modules’ (although one of my modules was called w1therm, so I used the real name (even though I think that ‘-‘ and ‘’ are interchangeable):
w1-gpio
w1_therm
I tried to see the temp sensor using these commands directly
sudo modprobe w1-gpio gpiopin=4
sudo modprove w1_therm
but nothing new appeared under ‘/sys/bus/w1/devices’, so I assume that either enumeration only happens at boot time, OR you could only assign the gpio pin during boot.
End result: Seems like you can’t specify the gpio pin after the device has booted, neither by manually loading the modules, nor by having the parameter specified as well in ‘/etc/modules’. So you have to do the same thing that that guy did, which was to add these entries to ‘/boot/config.txt’. It might have something to do with arm devices and something called device three, but once it worked I didn’t feel a need to figure it out completely.
# device tree config
dtoverlay=w1-gpio,gpiopin=4
I did however think that we could simplify his script a bit by using the ‘bc’ tool for handling fractions, instead of using bash magic for that.
You would need to install bc to run my script:
‘sudo apt-get install bc’
Other changes besides styles (not that there was anything wrong with it) was mainly explanations for why we have certain of the checks, as well as additional descriptions of how the system responds to events such as the removal of a sensor.
IMPORTANT: don't forget to change devices_to_log to include the devices you want to log.
The initial script I used for reading temperatures looked like this:
Source code:
#!/bin/bash
#
# Sample script for logging temperatures on a raspberry pi.
#
#
# Author Simon Gustafsson (www.optisimon.com)
#
# Heavily influenced by work of San Bergmans (www.sbprojects.com)


#
# Add all temperature devices to log from to devices_to_log
#
# (they are all available directly under /sys/bus/w1/devices/ and have
#  names starting with "28-")
#
devices_to_log="28-0214632b7eff 28-0314649cfeff 28-031464a4baff 28-04146dfd98ff 28-04146dfdc2ff"


#
# Time to sleep after reading all sensors before starting to read the next time
#
sleeptime=5


# Checking that the user does have bc installed
which bc &> /dev/null || {
  echo "ERROR: bc not installed. Installed it by typing";
  echo "sudo apt-get install bc";
  exit 1;
}

print_general_troubleshooting()
{
cat <<HEREDOC
NOTE:  This script is only tested on a NOOBS installation of raspbian as of 2015-07-11

       Did you add the following two lines to /etc/modules:
       w1-gpio
       w1_therm

       Did you add the following line to /boot/config.txt:
       dtoverlay=w1-gpio,gpiopin=4

       Have you rebooted the system once since you saved those changes?

HEREDOC
}

# Checking that the w1_gpio module is loaded
lsmod | egrep "^w1_gpio" &> /dev/null || {
  echo "ERROR: System might not be properly configured. The expected kernel module w1_gpio is not loaded"
  print_general_troubleshooting
  exit 1;
}

# Checking that the w1_therm module is loaded
# Do not exit on this error, since the right configuration would load
# this automatically if sensors connected later.
lsmod | egrep "^w1_therm" &> /dev/null || {
  echo "INFO:  System might not be properly configured. The expected kernel modules w1_therm and is not loaded."
  echo "       If the sensors wasn't connected during device boot, this kernel module might not yet be loaded."
  print_general_troubleshooting
}

# Checking that the expected sys path is there
[ -e /sys/bus/w1/devices ] || {
  echo "ERROR: System might not be properly configured. The path /sys/bus/w1/devices does not exist"
  print_general_troubleshooting
  exit 1;
}

# Takes one argument: an integer, to be divided by 1000 and formatted as a number with three decimals.
divide_by_1000()
{
  # Slightly messy sed expression on the end, to convert bc's implicit leading zero to explicit
  # (i.e. I want output such as 0.125 and -0.312 instead of .125 and -.312)
  echo "scale=3; $1 / 1000" | bc -l | sed -e 's/^\./0./' -e 's/^-\./-0./'
}


while true ; do

  date +%Y-%m-%d_%H.%M.%S

  for device in $devices_to_log ; do

    # Check for existance on bus
    [ -e "/sys/bus/w1/devices/$device/w1_slave" ] || {
      echo "$device: ERROR: Not found on bus!"
      continue;
    }

    reply=`cat "/sys/bus/w1/devices/$device/w1_slave"`

    # while debugging
    echo -e "REPLY:\n$reply\nENDREPLY\n"

    # Skip temperature for this sensor if CRC failed
    echo "$reply" | grep "YES" &> /dev/null || {
      echo "$device: ERROR CRC check failed!";
      continue;
    }

    # Skip temperature for this sensor if all returned bits are zero.
    # I typically get that when disconnecting one sensor for quite some time (2 minutes)
    # before the removed device disappears from the /sys filesystem
    echo "$reply" | grep "00 00 00 00 00 00 00 00 00" &> /dev/null && {
      echo "$device: ERROR only zero bits returned!";
      continue;
    }

    # Reformat and print temperature in a sensible way
    temperature_times_1000=`echo "$reply" | grep t= | sed -e 's/.*t=//'`
    temperature=`divide_by_1000 "$temperature_times_1000"`
    echo "$device=$temperature"
  done

  echo
  sleep $sleeptime
done
#Future improvements
The kernel documentation for the w1_therm module mentions that if none of the devices is parasitically powered, one should be able to start a conversion for all sensors at the same time, and read the result back from each sensor individually. That would drastically reduce the read out time when several sensors are used at the same time. It’s not implemented in the current kernel driver, but would be nice to have. I’m probably not the guy that’s going to do that though.
Another possible improvement would be to modify the script to check whenever we pass midnight (or 06:00), and run data analysis on the last 24 hours of data. Typical analysis might be some basic statistics, together with a daily temperature chart.
A more elaborate way to do the same would be to play around with logrotate and configure it with a postrotate script to analyze the data.